
Introduction
In this series, I will document the creation of my first game: a 2D platformer written in C++ using SFML.
Setting Up VS Code for C++ Game Development
Before we start coding, let’s set up VS Code for C++ development with SFML:
Prerequisites
- VS Code installed on your system
- C++ compiler (GCC on Linux/Mac, MSVC on Windows)
- SFML library installed
VS Code Extensions You’ll Need
- C/C++ by Microsoft - for IntelliSense and debugging
- C/C++ Extension Pack - includes additional helpful tools
- CMake Tools (optional) - if you’re using CMake
Project Structure
Create your project folder like this:
platformer/
├── src/
│   ├── main.cpp
│   └── entities/
│       ├── entity.hpp
│       ├── entity.cpp
│       └── player.hpp
├── build/
└── .vscode/
    ├── tasks.json
Setting Up Build Tasks
Create .vscode/tasks.json for compiling:
{
    "version": "2.0.0",
    "tasks": [
        {
            "label": "Build SFML Game",
            "type": "shell",
            "command": "g++",
            "args": [
                "-g",
                "-std=c++17",
                "src/*.cpp",
                "src/entities/*.cpp",
                // "src/input/*.cpp", add folder like this as we add more code
                "-lsfml-graphics",
                "-lsfml-audio",
                "-lsfml-window",
                "-lsfml-system",
                "-o",
                "build/main"
            ],
            "group": {
                "kind": "build",
                "isDefault": true
            }
        }
    ]
}
Here in the tasks.json file, we have to keep adding the folders as we create more of them to include the .cpp files in the build process, you will get a compiler error if you don’t.
Now you can press Ctrl+Shift+P → “Tasks: Run Build Task” to compile your game!
Ok, so let’s get started now!
What We’ll Build in Part 1
In this post, we’ll implement:
- A base
Entityclass to encapsulate common properties (position, velocity, rendering, collision). - A derived
Playerclass to handle input and movement.
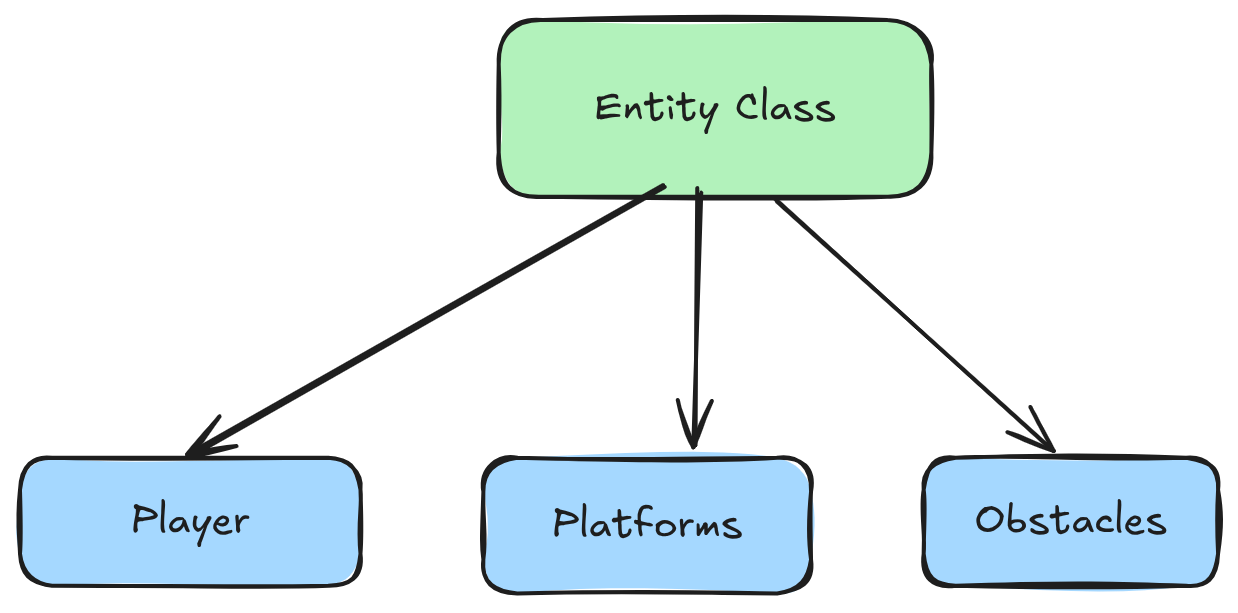
Architecture Overview
Our game objects will inherit from the Entity base class, allowing us to enable or disable features (physics, collisions) via compile-time flags.
Here is the overview of the class hierarchy:
Implementing the Entity Class
So let’s start implementing the Entity Class:
we will start by writing the header file and then implementing all those functions:
/entities/entity.hpp

#pragma once
#include <iostream>
#include <SFML/Graphics.hpp>


class Entity : public sf::Drawable {
    protected:

        // base shape params
        sf::Vector2f position;
        sf::Vector2f velocity{0.0f,0.0f};
        sf::Vector2f size;
        sf::Color color{sf::Color::Red};

        // the base shape
        sf::RectangleShape entity;


        // physics constants
        const float GRAVITY{9.0f};
        const float VEL_DEL{10.0f};

        // the draw method from the sf::Drawable class

    private:
        // overiding to convert this entity into an drawable object on the sfml window
        void draw(sf::RenderTarget& target, sf::RenderStates states) const override {
            target.draw(entity, states);
        }

    public:

        // flag to turn on physics on this entity
        bool physical{false};

        Entity();

        // update function to update params each frame
        // here we will have all physics being updated if it is there.
        virtual void update(float deltaTime);

};
Understanding the Entity Class
Our Entity class serves as the base for all drawable, movable objects in the game. Here’s a detailed breakdown:
-
Inheritance from
sf::Drawable
We inherit from sf::Drawable so SFML can render our object via the overriddendraw()method. This gets called automatically when we usewindow.draw(entityInstance)on a sf::RenderWindow. - Core Member Variables
sf::Vector2f positionandvelocity(docs): track where the entity is and how fast it’s moving.sf::Vector2f size: defines the width and height of the rectangle.sf::Color color(docs): default fill color for our shape.sf::RectangleShape entity(docs): the visual representation—initialized withsize,color, andpositionin the constructor.
- Physics Constants
const float GRAVITY: the acceleration applied downward each frame (pixels/s²).const float VEL_DEL: a modifier for velocity adjustments (e.g., jump impulse).
-
physicalFlag
A boolean that toggles physics updates. Iftrue, theupdate()method applies gravity and movement; iffalse, the entity remains static. - Constructor (
Entity())
In the implementation (entity.cpp), the constructor should:- Set
entity.setSize(size);andentity.setFillColor(color); - Initialize
position(e.g.,(0,0)) and callentity.setPosition(position); - Optionally configure origin or other shape properties.
- Set
update(float deltaTime)
Called once per frame withdeltaTime(time elapsed since last frame), ensuring frame-rate-independent behavior:- If
physicalis enabled, apply gravity:velocity.y += GRAVITY * deltaTime; - Update position:
position += velocity * deltaTime; - Sync the shape:
entity.setPosition(position);
- If
draw(sf::RenderTarget&, sf::RenderStates)
This private override simply tells SMFL window how to draw our Entity on the window:void draw(sf::RenderTarget& target, sf::RenderStates states) const override { target.draw(entity, states); }
By centralizing rendering, movement, and physics in one base class, derived classes (like Player or Enemy) can focus on their own behaviors—input handling, AI, animations—without rewriting common logic.
Next, we’ll implement these methods in entity.cpp.
the code looks like this:
#include "entity.hpp"


Entity::Entity(){
    // Set default position and size
    position = sf::Vector2f(100.0f, 100.0f);
    size = sf::Vector2f(50.0f, 50.0f);

    // Configure the rectangle shape
    entity.setPosition(position);
    entity.setSize(size);
    entity.setFillColor(color);
}

void Entity::update(float deltaTime){
    // here update all the params that you want to update
    // ex: physics params, the position of the entity

    // keep updating the position
    position.x += velocity.x;
    position.y += velocity.y;

    // apply gravity
    if (physical){
        // apply the acceleration
        velocity.y += GRAVITY * deltaTime;

    }

    // set the position for the entity
    entity.setPosition(position);
}
Further, this Entity class will also be expanded with more features like collision detection for each entity in the game, so
for a basic understanding all of the features that all game objects will have in common will be put in this class for
reusable code.
Now we can go ahead and implement a basic Player Class to have our first Game Object on screen.
The File structure looks like this:
├── src/
│   ├── main.cpp
│   └── entities/
│       ├── entity.hpp
│       ├── entity.cpp
│       ├── player.hpp
│       └── player.cpp
Now let’s implement the Class, first we will write the header file
#include <SFML/Graphics.hpp>
#include "entity.hpp"


class Player : public Entity{

    public:

        // constructor with all initial params
        Player(sf::Vector2f pos, sf::Vector2f vel);

        // here we don't need to implement the draw function again, as we did it in the
        // base entity class, which will be inherited here

        // write some getter and setter function here for the player
        void setPosition(sf::Vector2f pos);
        sf::Vector2f getPosition();

};
and then implementing all the functions, the file player.cpp looks like:
#include "player.hpp"


Player::Player(sf::Vector2f pos, sf::Vector2f vel){
    // init the player with these parameters
    position = pos;
    vel = vel;

    // sync the shape with the variables
    entity.setPosition(pos);


    // set the important flags here in the contructor
    // like we want the player to always have some physics
    // so we will set physical to true.
    physical = true;
}

// implement the setter and getter functions

void Player::setPosition(sf::Vector2f pos){
    position = pos;
    entity.setPosition(position);
}

sf::Vector2f Player::getPosition(){
    return position;
}
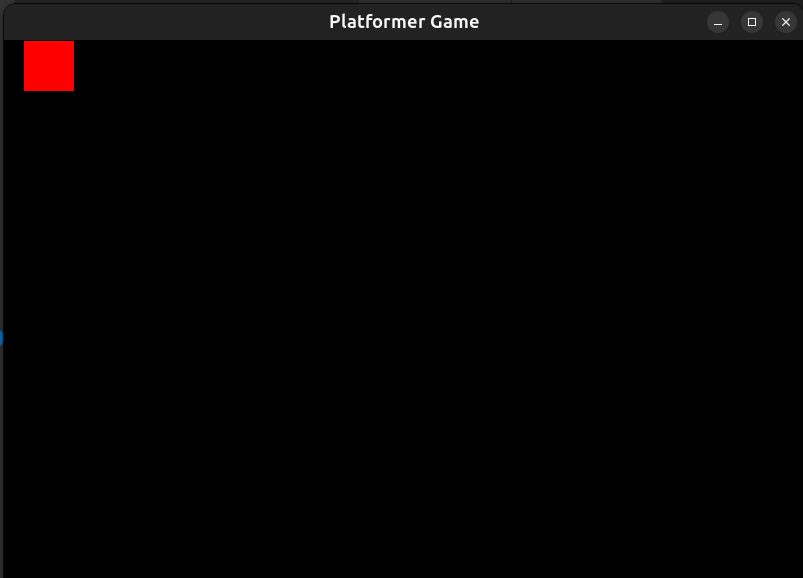
and setup the main.cpp like this and we will have a working window with a red square on the screen.
#include <SFML/Graphics.hpp>
#include <iostream>
#include "entities/player.hpp"

int main()
{
    // Create the main window
    sf::RenderWindow window(sf::VideoMode(800, 600), "Platformer Game");
    window.setFramerateLimit(60);

    // Create an entity
    Player player{sf::Vector2f(20.0f,0.0f), sf::Vector2f(5.0f,-10.0f)};
    player.physical = false;
    // init the clock
    sf::Clock clock;

    // Main game loop
    while (window.isOpen())
    {

        // get the deltaTime using clocok
        float deltaTime = clock.restart().asSeconds();

        // Process events
        sf::Event event;
        while (window.pollEvent(event))
        {
            // Close window: exit
            if (event.type == sf::Event::Closed)
                window.close();

            // Escape key: exit
            if (event.type == sf::Event::KeyPressed)
            {
                if (event.key.code == sf::Keyboard::Escape)
                    window.close();
            }
        }

        // Update the entity
        player.update(deltaTime);

        // Clear screen
        window.clear(sf::Color::Black);

        // Draw the entity
        window.draw(player);

        // Update the window
        window.display();
    }

    return 0;
}
Let me break down what’s happening in this main file:
- Window Creation - We create an 800x600 window and set the framerate to 60 FPS
- Player Object - We create our player at position (20, 0) with some initial velocity
- Game Loop - The classic game loop pattern:
- Handle input events (window close, escape key)
- Update game objects (our player)
- Clear screen, draw everything, display
- Delta Time - We use
sf::Clockto get the time between frames, making our physics frame-rate independent
For more details on SFML window creation, check out the SFML Window Tutorial. The game loop pattern is explained well in the SFML Graphics Tutorial.
In this demo, I’ve set physical = false so we can see the square on screen without it falling due to gravity. Try changing it to true and watch the square fall off the screen!
Testing Our Code
Now let’s build and run our game. Use the VS Code build task we set up earlier (Ctrl+Shift+P → “Tasks: Run Build Task”) or run this command in your terminal:
g++ -g -std=c++17 src/*.cpp src/entities/*.cpp -lsfml-graphics -lsfml-audio -lsfml-window -lsfml-system -o build/main
./build/main
If everything works correctly, you should see a window with a red square like this:
What We Built
So we’ve got our first game objects working! Here’s what we accomplished:
- Base Entity Class - Handles position, velocity, physics, and rendering
- Player Class - Inherits from Entity and adds player-specific functionality
- Working Game Loop - Updates and draws our player every frame
- Physics System - Gravity that can be toggled on/off
The cool thing is that now we can create any game object (enemies, platforms, power-ups) by just inheriting from Entity and they’ll automatically get all these features.
What’s Next
In the next post, we’ll make this actually feel like a game by adding:
- Input Handler Class - So we can control the player with keyboard
- Player Movement - Walking, jumping, and basic controls
- Collision Detection - So the player doesn’t fall through the ground
- Better Physics - Proper jumping mechanics and ground detection
Coming up in Part 2: Making the Player Move - Input Handling and Collision Detection